Sourdough
The Sourdough School: The ground-breaking guide to making gut-friendly bread by Vanessa Kimbell. Photography: Nassima Rothacker

How to make a starter
The Sourdough School book too many years to research and write and over 300 studies were referenced writing it. I’m often asked for a recipe but it’s not easy extracting parts of a 200+ word book, but it is fair to say that one you have got a sourdough starter going then you half way to making sourdough bread. So these are the instructions from the book to get a basic white starter going. There are other starters you can make but this is the most basic one, and anyone can do this for very little cost.
To create your own sourdough starter I recommend using just two ingredients – organic stoneground flour and water. It is important that the flour is stoneground as some modern roller-milling heats the flour to temperatures that can reduce the naturally occurring wild yeast.
Choose a warm room – not hot, not cold, just somewhere that is pleasant to be in. As the starter is acidic, and will react with certain metals, it needs to be made in a non-reactive container. I prefer glass, but plastic is fine too. You’ll also need a whisk, to incorporate air, and a breathable cover, such as a clean tea towel, coffee filter paper or a loose-fitting, disposable shower cap.
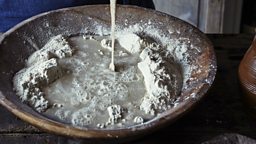
Begin by putting 150g organic stoneground wholegrain flour and 150g water heated to a temperature of 28°C in a large jar. Whisk the mixture vigorously and cover. Leave to sit in a warm place for 12–24 hours, but make sure there are no other cultured foods nearby or there will be a crossover and you may not get the microbes you need. After this time, you might be lucky enough to see some bubbles, indicating that organisms are present, but if not, don’t worry. Discard half the mixture and replace it with 75g flour and 75g water heated to 28°C. Stir vigorously, cover, and wait a further 12–24 hours.
From now on, you will need to remove and discard half the starter daily before every feeding so that the organisms in the starter can multiply without the jar overflowing. If you are somewhere warm you will
find activity begins quickly, usually after 3–4 days, but if you are in a more temperate climate then it can take 10–14 days for the starter to become beautifully bubbly and have enough yeasts and bacteria to bake with. When you are developing the starter keep it in a warm place to ferment. Once the fermentation is established, transfer the starter to the fridge and then begin the refreshment schedule.
How to refresh & maintain your starter to control flavour
When it comes to starters it is important to understand that different flours ferment at different rates, depending on the amount of enzymes and nutrients available to the microbes. Generally the wetter starters ferment faster and are more lactic and sweeter, whilst thicker, lower hydration starters are more sour, as the acetic acid producing microbes favour more oxygen-rich environments.
White roller-milled flour that ferments at a moderate rate over 6 –8 hours gives an optimal
microbial colony that is ready to make a leaven with. Rye is generally ready in about 3 hours
and wholegrain in about 4 hours.
What kind of flour do you recommend?
I recommend using organic flour made, if possible, from grain that has not been treated at
any time with fungicides, herbicides or artificial fertilisers; none of these agrochemicals belong
in a starter. In short, use organic.
How often should I refresh?
At least once a week, and always the day before you make a leaven.
Refresh your starter
How to refresh a white starter to make a loaf with a milky & sweet with a light tang
This formula encourages homofermentative LAB
This starter produces very light-flavoured French style milky bread and it’s one I was first introduced to in the French bakery when I was growing up. We use finely milled organic white flour. The starter is kept at 100% hydration, meaning equal quantities of water to flour.
25g white starter
100g organic white flour
100g water at 36°C
Mix all the ingredients in a pot, leaving room for the starter to rise again by half. Cover with a breathable lid and leave to ferment at an ambient temperature of 20–23°C for 8–10 hours. Ideally use straight away to make a leaven. ( this is a 2nd build that increases the microbial number without the need to discard any starter) If that’s not possible, refrigerate and use to make a leaven within 8 hours. Refrigerate the remainder in a covered pot until next needed.
Refresh your starter least twice a week
It is imperative before you start baking that you reactivate your starter and build the microbial numbers. To do this you simply remove the mother from the fridge. She will be liquid and smell sour but not unpleasant. Don’t worry if there is a hooch on top, just stir it back in, or if it is very old pour it away.
1. Put your starter into a jug of water.
2. Discard the remaining starter. Don’t be tempted to use more - it will acidify the new starter. Clean your pot thoroughly with hot water.
3. Pour in the milky-looking sourdough-inoculated water into the now clean pot and stir in the flour. Mix well.
4. Leave the jar, loosely covered, in a cool but not cold area, such as the kitchen worktop, overnight. This way the yeast and bacteria colonise the mixture and it will be ready to make a leaven with when it is bubbly, has doubled in volume and is full of life again. When your starter is at its microbial peak it needs to go back into the fridge, covered but not totally airtight. Please remember not to use every last bit when you bake as you need some to build a new starter back up.
TOP TIP
. . I understand that many people think this is wasteful to discard old starter. I would go as far as to say that some people find throwing it away distressing, but it is the correct procedure for refreshing a sourdough starter. You need to keep only 25g of starter to maintain an active starter. This is important because the refreshment process feeds the microbes, and helps to maintain the right level of acidity for optimum yeast activity. A healthy and active starter is the first step in baking a beautiful, well-risen, open crumb loaf. And this does mean that there will be excess starter. If you hate the idea of any waste, there’s a recipe in the book on p127 (Russian rye bread) which uses leftover discard from your starter. Or try searching for ‘sourdough discard recipes’ – there are a lot of ideas out there. The discard can also be composted if your compost bin contains plenty of other material to offset the acidity.
If you want to bake once you have your starter established there is also a very basic beginners recipe here that you can bake sourdough. The Sourdough School: The ground-breaking guide to making gut-friendly bread by Vanessa Kimbell
More Food on the 成人快手
-
![]()
Browse our selection of recipes from top chefs, cooks and food writers who have joined us on Woman's Hour...
-
![]()
Download this interview, or subscribe to the Cook the Perfect...downloads
-
![]()
Browse over 13,000 recipes on the 成人快手 Food website